介绍
在 Unity 中制作 UI 中显示 3D 模型时,都会需要另一个专用的模型相机来显示,同时根据 UI 元素的大小与位置设置相机参数,使模型显示在 UI 元素区域内。
具体方法见 Unity 相机视口适配 UI 控件 - 狂飙
但有时候需要将显示区域扩展到全屏,这样可以显示一些特效或多出的动画之类的。
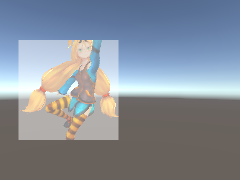
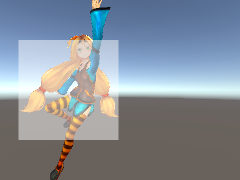
对比
左侧是被裁剪的效果,右侧是需要达到的效果。
环境
理论上与 Unity 版本无关。
思路
正常做法是使用 RectTransform 表示显示区域,然后使用坐标转换获得四个顶点的视口坐标,然后设置相机的 Viewport 参数。
但是这样做完之后会相机是有边界的,如果静止或者播放动作时模型大小超过相机显示区域就会被裁剪掉。
因为默认修改 Viewport 可行,尝试将其作为基础,然后将其扩大为整个屏幕。
这样涉及到两个坐标系的转换。
相机焦点在中心的投影矩阵是最普通的,可以在图形相关的书籍中查询到。
由于需要移动相机焦点,因此尝试使用其他方案,搜索查找到:
Unity Camera中心点的偏移 - Jason_c - 博客园
但是这个方案需要修改相机的世界坐标位置,而且涉及到相机焦点移动多少的计算方式不便。
查看 Unity 官方文档,Unity 在第二个样例代码中提供了一个通用的公式来修改投影矩阵。
这个公式其实就是 OpenGL 的投影公式:
根据现有的信息,列出:
- 已知:缩小的视口大小信息 缩小的相机参数 全屏的视口大小信息
- 求:全屏的相机参数
因为 缩小视口比全屏视口 等于 缩小相机参数比全屏相机参数,所有可以通过公式计算出全屏相机参数。将计算出的上下左右信息放入公式后就可以得到最终的投影矩阵,赋值给相机即可。
注意:
- 在求缩小相机参数垂直高度时需要使用正切函数计算,因为 Unity 使用的是垂直视角。
- 计算缩小相机参数水平宽度时需要使用垂直高度乘以视口比后还要乘以屏幕宽高比,因为视口坐标是归一化的,而相机的参数是未归一化的,需要考虑屏幕宽高比。
其实这种方案最终的结果是移动了相机的焦点位置,但是通过暴露一个 UI 模型显示区域接口,可以方便地与 UI 结合使用。
应用
在实际使用时一定要注意原始的模型相机 FOV,尽量设的小一些,否则扩大后模型在屏幕边缘会有较为严重的形变。
一般来说根据 UI 指定区域大小占屏幕大小的比例乘以当前场景相机的 FOV 设置。
核心代码
 1
 2
 3
 4
 5
 6
 7
 8
 9
10
11
12
13
14
15
16
17
18
19
20
21
22
23
24
25
26
27
28
29
30
31
32
33
34
35
36
37
38
39
40
41
42
43
44
45
46
47
48
49
50
51
52
53
54
55
56
57
58
59
60
61
62
|
// targetRect 是 modelCamera 的 viewport 参数,需要设置全屏的时候传递 (0, 0, 1, 1)
public static void ApplyUIRectToCamera(RectTransform displayArea, Camera uiCamera, Camera modelCamera, Rect targetRect)
{
    var corners = new Vector3[4];
    displayArea.GetWorldCorners(corners);
    var bottomLeft = uiCamera.WorldToViewportPoint(corners[0]);
    var topLeft = uiCamera.WorldToViewportPoint(corners[1]);
    var topRight = uiCamera.WorldToViewportPoint(corners[2]);
    var bottomRight = uiCamera.WorldToViewportPoint(corners[3]);

    var rect = new Rect();
    rect.x = Mathf.Clamp01(bottomLeft.x);
    rect.y = Mathf.Clamp01(bottomLeft.y);
    rect.width = Mathf.Clamp01(topRight.x - topLeft.x);
    rect.height = Mathf.Clamp01(topRight.y - bottomRight.y);

    float halfHeight = Mathf.Tan(Mathf.Deg2Rad * modelCamera.fieldOfView / 2f) * modelCamera.nearClipPlane;
    float actualWidth = Mathf.Clamp01(rect.x + rect.width) - Mathf.Clamp01(rect.x);
    float actualHeight = Mathf.Clamp01(rect.y + rect.height) - Mathf.Clamp01(rect.y);
    float halfWidth = halfHeight * actualWidth / actualHeight * Screen.width / Screen.height;
    float halfActualWidth = actualWidth / 2f;
    float halfActualHeight = actualHeight / 2f;

    float left = -halfWidth * ((Mathf.Clamp01(rect.x) + halfActualWidth - targetRect.x) / halfActualWidth);
    float right = halfWidth * (((targetRect.x + targetRect.width) - (Mathf.Clamp01(rect.x) + halfActualWidth - targetRect.x)) / halfActualWidth);
    float bottom = -halfHeight * ((Mathf.Clamp01(rect.y) + halfActualHeight - targetRect.y) / halfActualHeight);
    float top = halfHeight * (((targetRect.y + targetRect.height) - (Mathf.Clamp01(rect.y) + halfActualHeight - targetRect.y)) / halfActualHeight);

    Matrix4x4 m = PerspectiveOffCenter(left, right, bottom, top, modelCamera.nearClipPlane, modelCamera.farClipPlane);
    modelCamera.projectionMatrix = m;
    modelCamera.rect = targetRect;
}

private static Matrix4x4 PerspectiveOffCenter(float left, float right, float bottom, float top, float near, float far)
{
    float x = 2.0F * near / (right - left);
    float y = 2.0F * near / (top - bottom);
    float a = (right + left) / (right - left);
    float b = (top + bottom) / (top - bottom);
    float c = -(far + near) / (far - near);
    float d = -(2.0F * far * near) / (far - near);
    float e = -1.0F;

    Matrix4x4 m = new Matrix4x4();
    m[0, 0] = x;
    m[0, 1] = 0;
    m[0, 2] = a;
    m[0, 3] = 0;
    m[1, 0] = 0;
    m[1, 1] = y;
    m[1, 2] = b;
    m[1, 3] = 0;
    m[2, 0] = 0;
    m[2, 1] = 0;
    m[2, 2] = c;
    m[2, 3] = d;
    m[3, 0] = 0;
    m[3, 1] = 0;
    m[3, 2] = e;
    m[3, 3] = 0;
    return m;
}
|
参考信息
如果想了解更多关于投影矩阵的的内容,可以参考下面链接的内容,以 Unity 举例,图文并茂: